

How To Register Printer With Google Cloud
Solusi
You can use your Catechism printer for Google Cloud Print, post-obit the procedures explained beneath.
In Google Deject Print, y'all will exist able to print from anywhere you like using a PC, smartphone, or other types of PDA.

What to do - Outline -
You need to perform the following to use your Catechism printer for Google Cloud Print:
1. Prepare the following:
a) Google account information (Your e-mail address and countersign to log in Google.)
b) Printer Supporting Google Cloud Print
c) PC, smartphone, or other types of PDA connected to the Cyberspace
d) One sheet of A4 manifestly paper
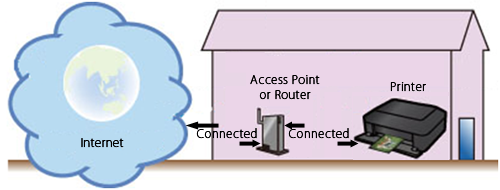
ii. Check the printer connectedness surround.
The printer needs to be connected to the Cyberspace via an access point or router.
3. Register the printer to Google Cloud Print.
Preparing the items required
To utilize the printer for Google Deject Print, you need to annals the printer to Google Cloud Impress.
Prepare the post-obit:
a) Google account information
Your due east-postal service (Gmail) address and password to log in to Google.
If yous do not accept them, you lot have to create your own account.
To create an account, access to the Google Accounts page, or click [CREATE AN Account] in the upper right corner of the Gmail: Email from Google (Google log-in) page.
CAUTION
The pages you lot will see may differ from the ones given below.

c) PC, smartphone, or other types of PDA
The PC, Smartphone, or other types of PDA needs to be continued to the Internet (including via the 3G line).
d) One canvas of A4 plain paper
Checking the printer connection environment
To use the printer for Google Cloud Print, the printer needs to be connected to the Internet.
Confirm that the printer is connected to an access point or router, and that the access point or router is connected to the Internet.
Circumspection
If the printer is not connected to the access indicate or router, download the manual [ Guide for Printer Setup for Network ] (PDF) from the Canon download site, and follow the instructions to found the connection.
* To utilize those services on the intranet, open Port 5222 (both on the PCs and the intranet).
Registering the printer to Google Cloud Print
Follow the procedures beneath to register the printer to Google Deject Print.

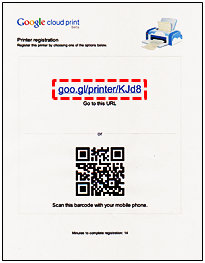
one. Print the authentication URL.
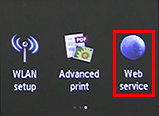
(1) Confirm that the printer is turned on.
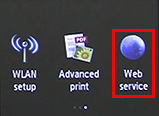
(2) Tap [Web service].
(iii) Tap [Spider web service setup].

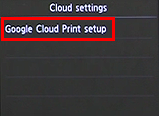
(4) Tap [Deject settings].

(5) Tap [Google Cloud Print setup].
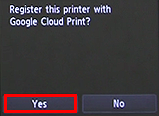
(6) Tap [Register with Google Deject Print].

(7) At the following message, tap [Yes].
(8) Tap [Next].

(9) At the post-obit screen, tap the language you lot select.

(10) At the post-obit message prompting you lot to print the hallmark URL, set up A4 paper in the cassette and tap [OK].

The hallmark URL is printed.
REFERENCE
This printout is used later in the registration process.
(11) Confirm that the URL is printed properly, then tap [Yep].

(12) Make sure that the message indicating that the hallmark process is being done is displayed.
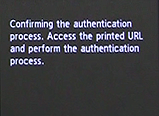
Proceed to Stride 2.
Important
Registration (authentication) must be completed in 14 minutes.
Proceed to the next footstep promptly.
CAUTION
If an error message is displayed indicating that the registration (authentication) failed, start from Step 1 to print the URL again.
2. Using the printed URL, annals the printer to Google Cloud Print.
(one) From the PC, smartphone, or other types of PDA, enter the URL in the Web browser.
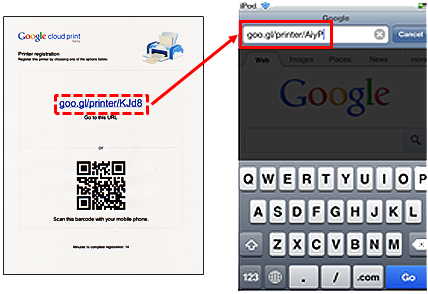
REFERENCE
With a device having the bar lawmaking reader functionality such as a smartphone, the URL can be entered past reading the bar code instead of entering it from the keyboard.
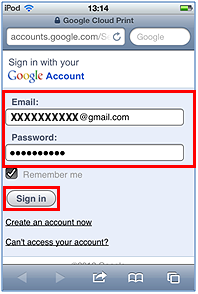
(2) At the following screen, enter your account information (Gmail accost and countersign), and tap [Sign in].
(three) At the "Printer Confirmation" screen, tap [Cease printer registration].

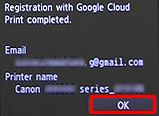
(4) After a while, the message is displayed on the printer LCD, indicating that the registration is completed. Printing the OK push.
Caution
The printer name displayed is used to print in Google Cloud Print.
CAUTION
If an error bulletin is displayed to signal that the registration failed, press the OK push button, and start from Step 1 again.
The printer is properly registered to Google Cloud Print.
Printing from a PC or a PDA using Google Cloud Impress
In Google Cloud Print, when you send print data to the registered printer, the printer will receive and print them automatically.
1. Confirm that the printer is turned on.
2. On a PC or a PDA, start the application supporting Google Cloud Print such as Chrome Browser, Gmail, and Docs.
IMPORTANT
For the latest application software supporting Google Cloud Print, bank check the Google Cloud Print home page.
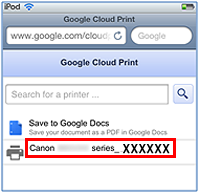
iii. In the awarding software, tap the wrench icon  or the pull-downward carte du jour
  , and select Google Cloud Print.
4. Select the registered printer.
v. Tap [Print].

Caution
The procedures for printing will vary co-ordinate to the application software or the servicing.
Depending on the communication conditions, it may take a long time until printing starts, or the print data may not exist received past the printer.
When an error occurs in the printer ("no paper," etc.), the printer may stop during printing.
Before resuming printing, bank check the printer conditions.
REFERENCE
When a newspaper blazon other than Plain Newspaper is selected, or when a paper size other than A4, Letter of the alphabet, B5, and A5 is selected, printing is done on one side of newspaper even if double-sided printing is selected.
When the plain paper is selected, or when B5 or A5 size is selected, printing is done with borders (white margins) even if borderless printing is selected.
Depending on the print data, the printout may look dissimilar from the data themselves.
In some devices, print settings cannot be fabricated when sending print data using Google Cloud Print.
If you would like to impress manually using Google Cloud Print
If the print information is non received by the printer automatically, or if you would like to print immediately subsequently you transport the print data, press can be started manually.
1. Confirm that the printer is turned on.
2. Tap [Spider web service].
3. Tap [Start Cloud impress].
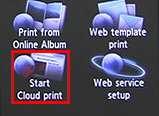
4. Tap [Print from Google Cloud Print].

5. The message is displayed asking if you lot would like to connect to the server to check for the print data.
Tap [Yeah].

6. When print data exists, information technology will be received and printed by the printer.
REFERENCE
The [Start Deject Print] selection does not appear in the card unless the printer is properly registered to Google Cloud Print.

Source: https://id.canon/id/support/8201562200
Posted by: hairstonhumothisent.blogspot.com
0 Response to "How To Register Printer With Google Cloud"
Post a Comment